12c Agent Deployment & Issues (Host Unable to Communicate with OMS)
In this Article we are going to cover
1) Deployment of 12c Agent.
2) Resolving issues with OMS communications to Host during 12c Agent Installation.
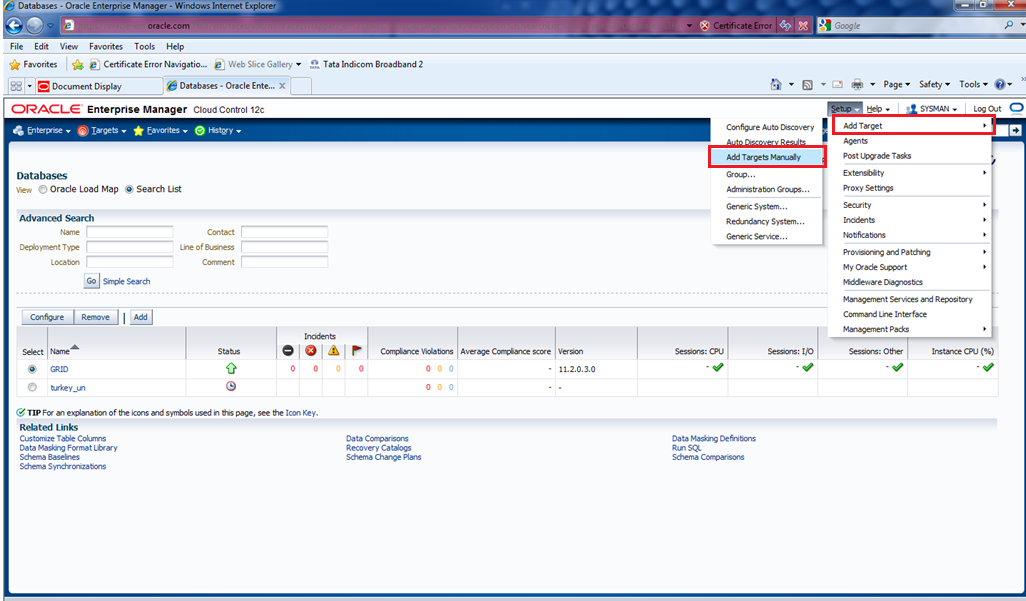
After the installation of 12c, Go to Add Host Status page to verify the installation and you can see phases of the deployment operations such as Initialization, Remote Prerequisite check and Agent Deployment. In the Add Host Targets console after you click Deploy Agent to monitor and manage the one or more agents. You can track the status of the deployment sessions then go to Setup menu, Click Add Targets manually, On the Add Targets Manually page you can view the options “Add Host Targets” and click “Add Host Results“.
Once you initiate the Agent deployment and if process fails, then review the information you have been provided of each phase in the Agent Deployment Details division. Here you can choose with the deployment process only on those remote hosts that have successfully cleared the checks and you can ignore the one that have either Warning (or) Failed status. For that click on “Continue” and select Continue, Ignoring failed Hosts. To fix those problems review the entire description and fix the problem if there is any fault settings (or) take action as recommended by Oracle. In such case you can choose to retry the Agent deployment with the same installation details you have provided. For that you have to click “Retry” using same inputs (or) select Update inputs and then click on “Retry”. If you want to cancel the running deployment session, you can directly terminate by using “Cancel” button.
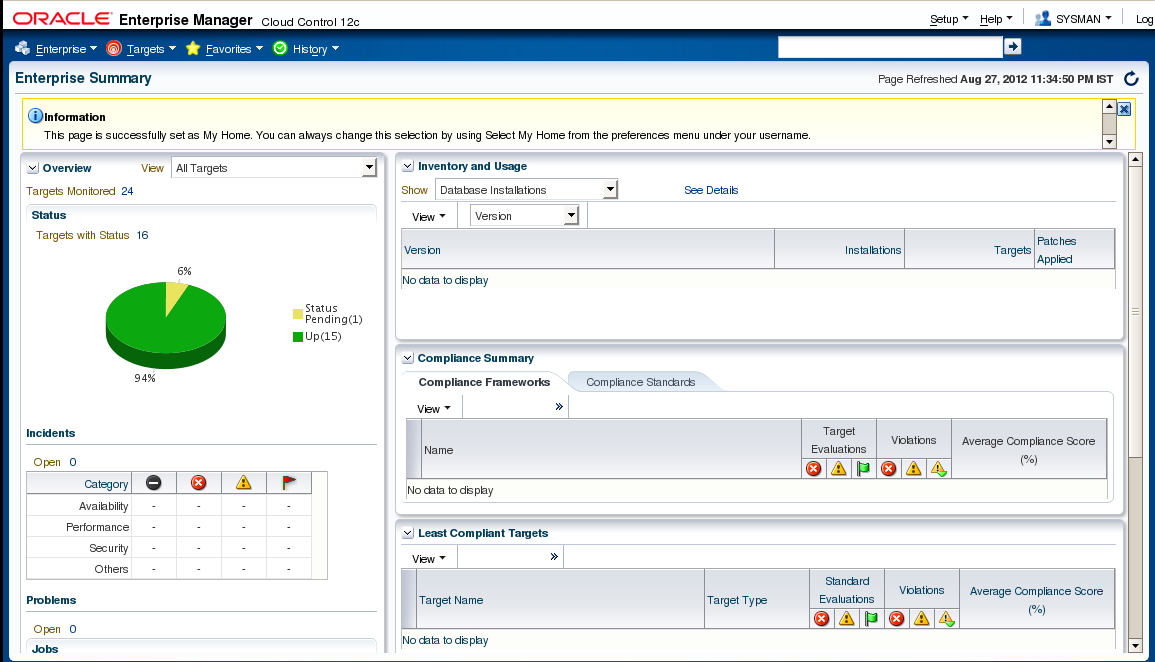
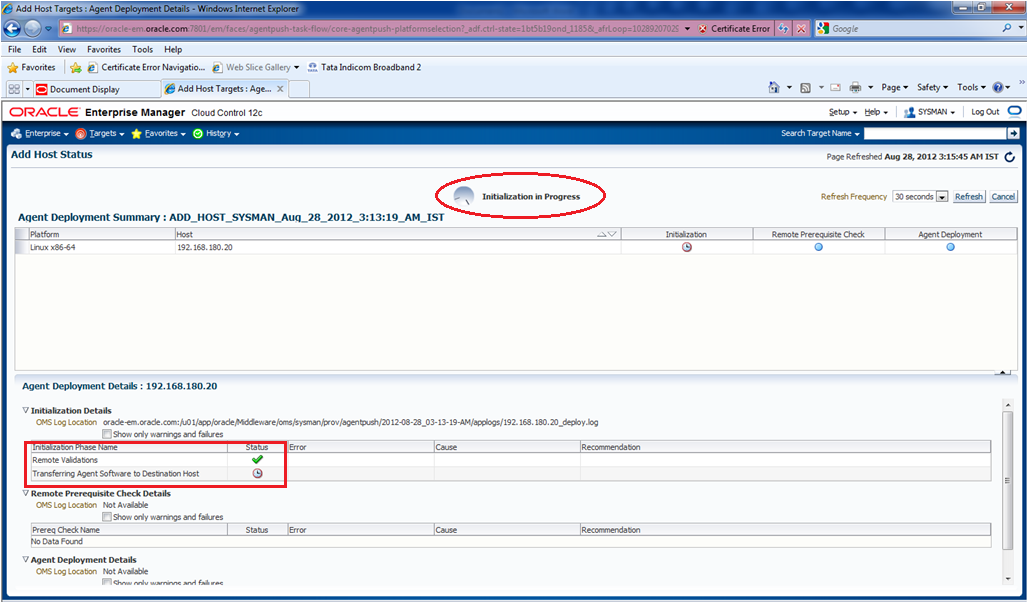
You can view below screen after the installation of 12c.
From 12c there are several ways to add agents to the GRID EM, We will discuss here how to add agent(targets) manually.
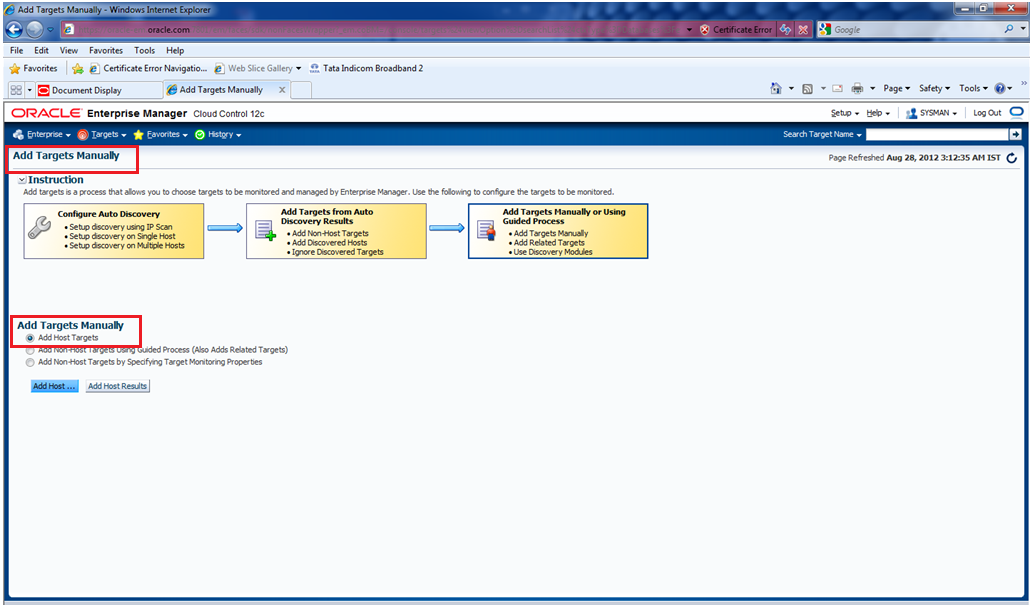
After selecting above option “Add Targets Manually“, A new console will be established related to “Add Targets Manually“
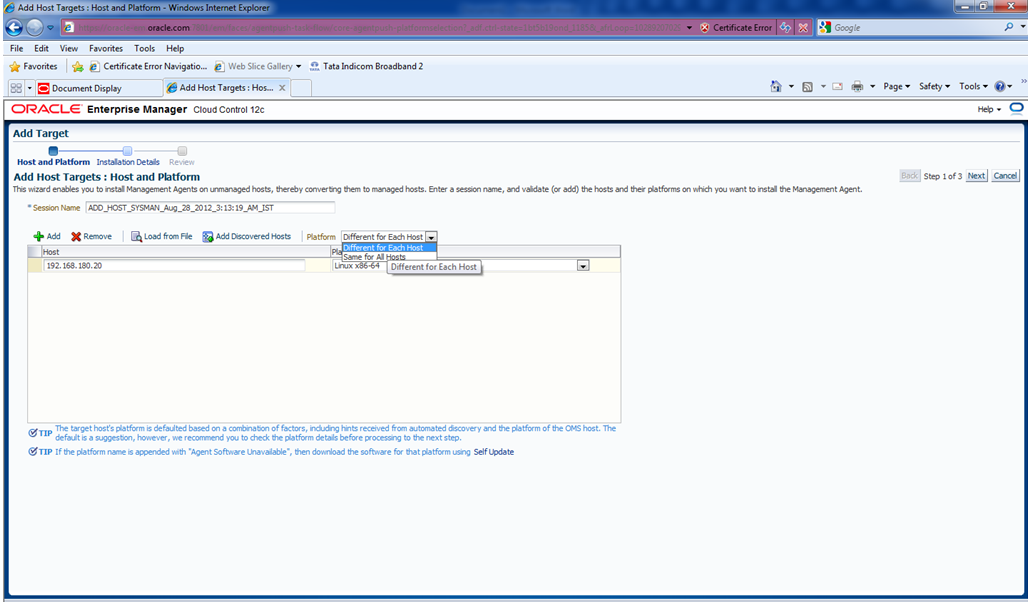
Here you will be having three options as above, We select “Add Host Targets” and then the another page will be opened to add Session names, as below, Now add the Host and platform details to process further for “Installation Details“
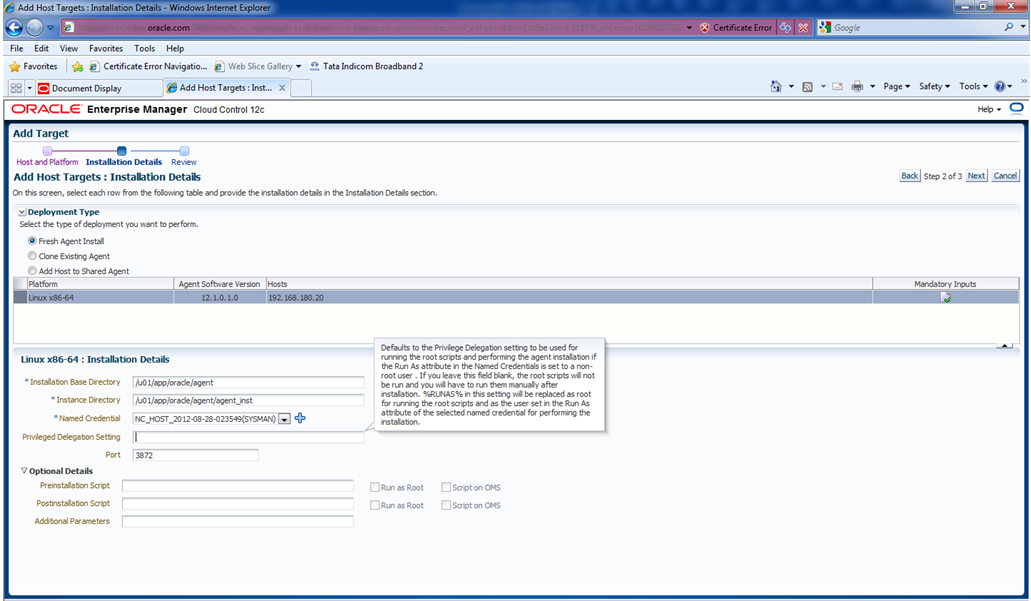
After the above page details, It will take you to add more installation details Ex: Deployment details, Instance Base Directory and so on….
Here you can see the available Agent Software version, host names where you are going to deploy and also in detail installation details with the platform. Once you submit the Agent deployment summary console will be opened and configuration will be initiated.
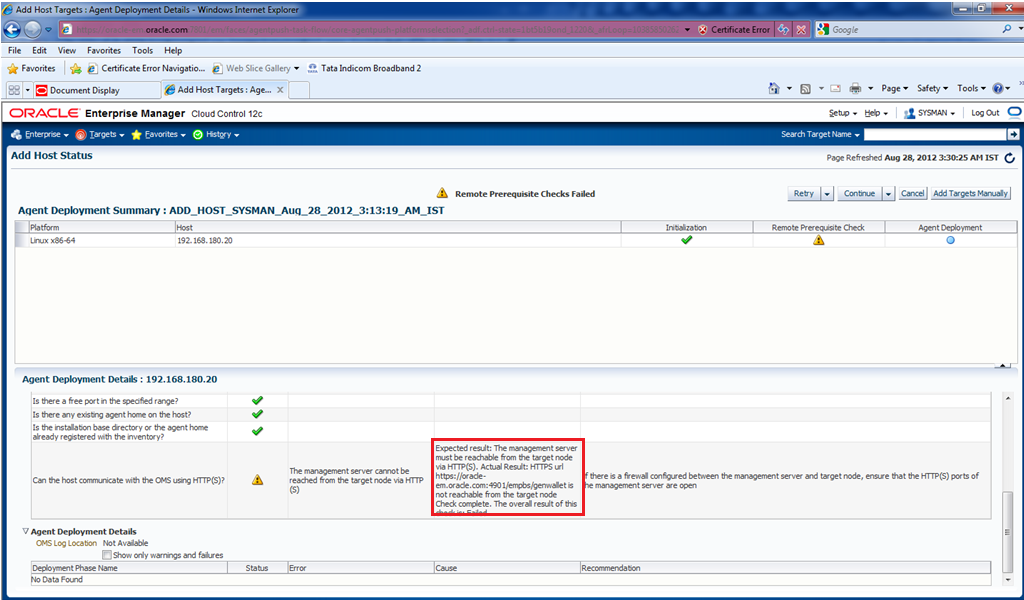
After the prerequisites of “Port Range“,”Agent Home on the Host“,”Base directory to install“, GRID performs check whether “Can the Host Communicate with the OMS using HTTP(S)” or not. Now the Agent deployment failed due to the Error “The management server cannot be reached from the target node via HTTP(S)” and you can see the error description with Recommendation in the below screen.
This issue is common due to existing firewall between OMS host and Target host where the Agent is being installed. Now from the Agent machine run the below command and see whether it is working or not.
[oracle@oracle-stby agent]$ wget --no-check-certificate https://oracle-em.oracle-ckpt.com:4901/empbs/genwallet
--03:49:14--  https://oracle-em.oracle.com:4901/empbs/genwallet
Resolving oracle-em.oracle-ckpt.com... failed: Temporary failure in name resolution.
[oracle@oracle-stby agent]$
Now here error is unable to resolve the name “oracle-em.oracle-ckpt.com“, This issue can be with two reasons they are
- If required, add an entry for OMS host to the /etc/hosts file on the Agent machine in Fully Qualified Domain name Format
- If there is a firewall; ensure the OMS port is reachable from the Agent machine.
In my environment, There was problem with improper settings of hostnames given in the “/etc/hosts” file 😉 Now i corrected it and again ran the same command and check whether it is able to send the request or not.
[oracle@oracle-stby ~]$ wget --no-check-certificate https://oracle-em.oracle-ckpt.com:4901/empbs/genwallet
--03:50:40--  https://oracle-em.oracle-ckpt.com:4901/empbs/genwallet
Resolving oracle-em.oracle-ckpt.com... 192.168.180.40
Connecting to oracle-em.oracle-ckpt.com|192.168.180.40|:4901... connected.
WARNING: cannot verify oracle-em.oracle-ckpt.com's certificate, issued by `/O=EnterpriseManager on oracle-em.oracle-ckpt.com/OU=EnterpriseManager on oracle-em.oracle-ckpt.com/L=EnterpriseManager on oracle-em.oracle-ckpt.com/ST=CA/C=US/CN=oracle-em.oracle-ckpt.com':
  Self-signed certificate encountered.
HTTP request sent, awaiting response... 200 OK
Length: 173 [text/html]
Saving to: `genwallet'
100%[===================================================================================================>] 173         --.-K/s   in 0s
03:50:41 (2.54 MB/s) - `genwallet' saved [173/173]
[oracle@oracle-stby ~]$
After the correcting the host names and the check with “wget” now start deploying agent with the same information you provided previously.
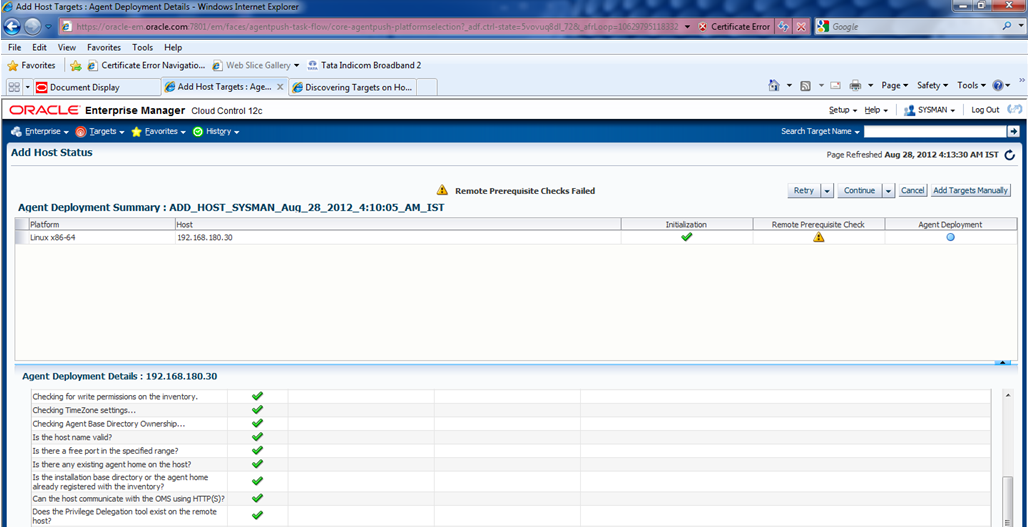
Now OMS can be reached from the Target via HTTP(S) and you can see the status with “Green checks“, By the above all the step by step method we can see deployment of the agent and also to fix the issue with OMS and Target connectivity.
After the Agent Deployment, Navigate to the Management Agent home and then run the following command to check whether the management agent is up and running.
$<AGENT_HOME>/bin/emctl status agent
If the Agent is down start the Management Agent with the below command.
$<AGENT_HOME>/bin/emctl start agent
and from the Management home run the following command to check the message that EMD upload completed successfully or not.
$<AGENT_HOME>/bin/emctl upload agent
Any comments or any content you want to add please update the post and always welcome. 🙂
— Happy Reading —

That was wonderful to read such an informative session…Thnx for sharing it..
Firdous,
Thanks for your feedback. 🙂
Basha .. Nice post .. Appreciated your hard work for this topic.Great work … 🙂